
Next up is the lamination process. The original Donkey Kong control panel is 9/16" thick to accommodate the t-molding which goes on the front edge. In order to get this thickness I decided to use a 1/2" piece of MDF and laminate it with a 1/16" piece of ABS plastic. This stuff is available in lots of different places (eBay and Amazon have it) and isn't too expensive.
The first thing I did was cut out a piece of the ABS plastic about 1/2" oversized all the way around:
 I used my trusty contact cement to bond the plastic to the MDF:
 I use a foam brush to apply the contact cement to both mating surfaces. I probably went a little overboard but it didn't make a difference - the MDF is porous so I wanted to be sure I had enough on there.

 After waiting 20 minutes for the glue to dry I placed a scrap piece of MDF on top and used a cinder block to apply pressure in order to achieve a tight bond.
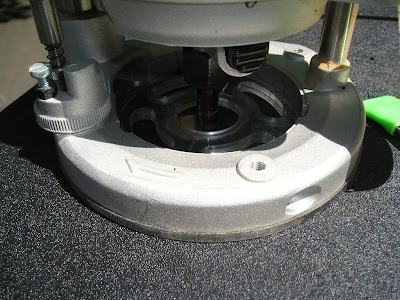
 It worked! After about 10 more minutes I used my router (with the pattern bit again) to trim the ABS plastic flush with the panel. You can see what a clean job the router does - it came out perfect.

 The next thing I had to do was trim around the button holes. I used a drill and a step bit to start and then when the hole was big enough I stuck the pattern bit in there and flush trimmed the button holes just like I did around the outside.


 After that was finished I used my drill bit to drill out the 8 holes in the ABS plastic for the control panel overlay. Easy!
We are almost there. Next up is routing the recess in the back for the joystick and routing the groove for the front latch to rest in.
More later.
The first thing I did was cut out a piece of the ABS plastic about 1/2" oversized all the way around:
 I used my trusty contact cement to bond the plastic to the MDF:
 I use a foam brush to apply the contact cement to both mating surfaces. I probably went a little overboard but it didn't make a difference - the MDF is porous so I wanted to be sure I had enough on there.
 After waiting 20 minutes for the glue to dry I placed a scrap piece of MDF on top and used a cinder block to apply pressure in order to achieve a tight bond.
 It worked! After about 10 more minutes I used my router (with the pattern bit again) to trim the ABS plastic flush with the panel. You can see what a clean job the router does - it came out perfect.
 The next thing I had to do was trim around the button holes. I used a drill and a step bit to start and then when the hole was big enough I stuck the pattern bit in there and flush trimmed the button holes just like I did around the outside.

 After that was finished I used my drill bit to drill out the 8 holes in the ABS plastic for the control panel overlay. Easy!
We are almost there. Next up is routing the recess in the back for the joystick and routing the groove for the front latch to rest in.
More later.
No comments:
Post a Comment